Want to create simple WordPress order forms?
After all, not everyone needs WooCommerce like shopping website.
Sometimes the requirements are very basic and for that using bulky plugins like WooCommerce doesn't make sense.
This is where WPForms and its new feature comes into play.

With WPForms, now you will be able to make simple WordPress order forms without any technical knowledge.
You can also charge your customers via PayPal, Stripe, etc. or create order forms without any online payment options.
The choice is yours.
Although, WPForms is available for free on WordPress repository, this feature is only available for Pro plan or above.
Try it for FREE
It's free to download. Go ahead and test it yourself.

Why Do I Need Order Forms?
Well, it's totally up to you but here are few situations where you would like to create WordPress order forms:
- Selling Services (Consulting, Teaching, Freelancing, etc.)
- Selling Digital Products (eBooks, Subscriptions, etc.)
- Donation
- Collecting Fees (School, Tuition, etc.)
- Or you can also use it like an eCommerce site by selling physical products, and many more.
Now let's see how to create your WordPress order forms.
How To Create Simple WordPress Order Forms?
Like I said, first of all you need the WPForms plugin installed and activated on your WordPress website along with the Pro plan or above.
This feature is not available in the other plans and free version.
So if you don't have the pro plan then get it form here.
Once the plugin is installed and activated, you can start creating the forms. And as I said before, you can create order form with or without online payment options enabled.
Let's create one with online payments enabled.
Step 1: Create Simple WordPress Order Form
Go to your WordPress dashboard » WPForms » Add New and select Billing / Order Form option.
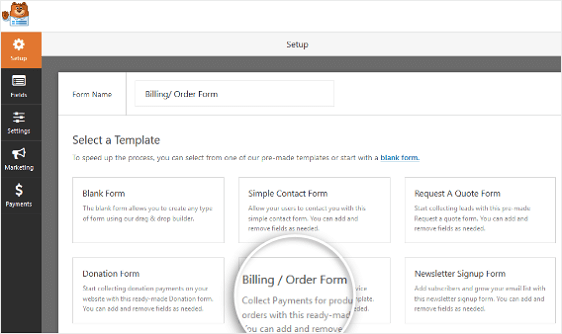
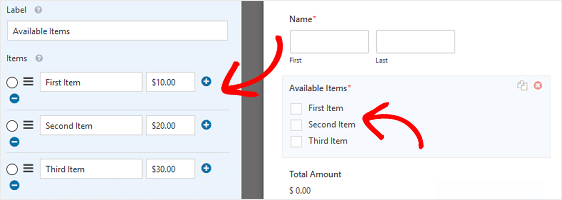
Now click on the "Available Items" section to open the "Field Options" and edit the items that you would like to add to your order form.
You can name your items, set prices, and sort them as you like. By the way, you can use single item as well. It's not necessary to have multiple items.
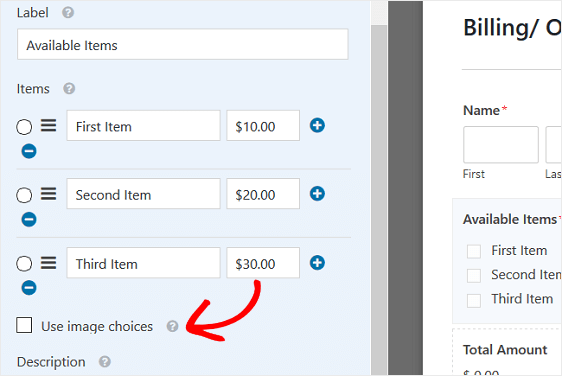
And hey, if you don't like the boring text options then you can replace them with images as well. Cool right?
Just check the box "Use Image Choices" and you are good to go.
Once you are done editing those options, click save to save the changes.
Step 2: Setup Form Notifications
Now it's time to set up your email notifications for the form. To do this, head over to the "Settings" option from the WPForms panel on the left.
See the screenshot below:
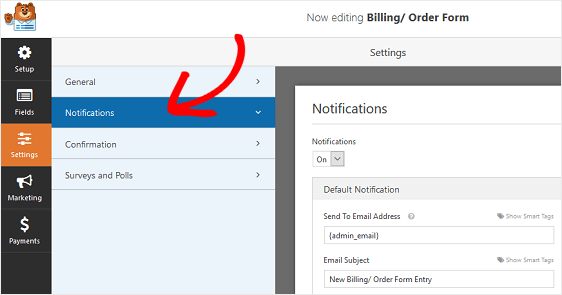
Now click on the Show Smart Tags option corresponding to "Send To Email Address" field.
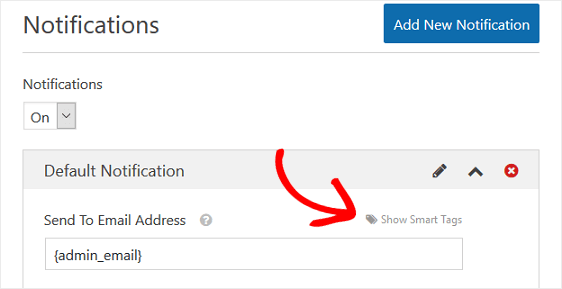
And select "Email".
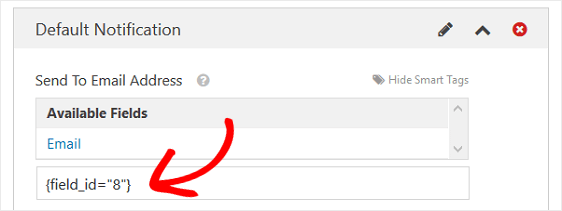
Now you can edit the other fields like Form Name, From Email, etc. as you like and customize your email notifications for the order form.
Easy right?
Step 3: Setup Order Confirmations
Again from the side panel of WPForms, select Confirmation option and there you will have 3 different options to choose from:
- Message
- Show Page
- Go To URL (Redirect)

Message: As the name suggests, this option will display a message as the order confirmation. You can customize the message as you like but I would recommend using "Show Page" option.
Show Page: With this option you can take the user to a specific page as the order confirmation. Most likely, you'll create a thank you page instead of just plain order confirmation page.
And the thank you page is a great opportunity to convert your user to a more loyal customer or to up sell something else. That's why I recommend this option.
Go To URL (Redirect): It's pretty clear what would happen. By using this option you can redirect your users to any specific URL. In most cases, you will not need this option but it's great that this option is also available to use if needed.
Step 4: Setup The Payment Options
It's time to setup the payment options for WordPress order forms. And the options that you can use are PayPal, Stripe, , etc.
Again, to enable payment options, go to "Payments" option from your WPForms side panel.
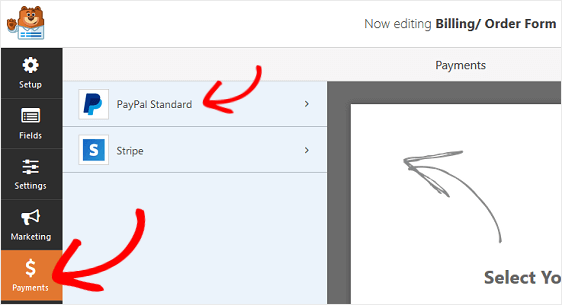
You can choose your payment option here and customize them further. In my case, I have selected PayPal.
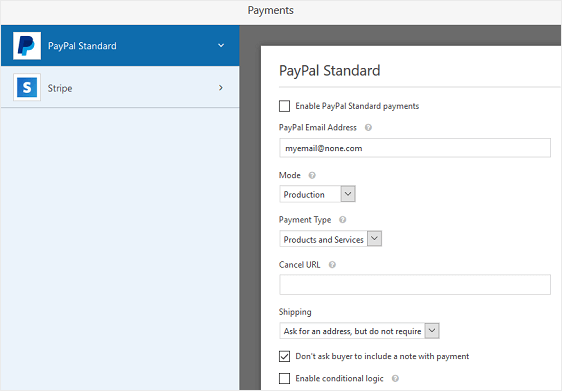
If you have selected PayPal Standard, make sure to choose the Mode "Production" and the Payment Type as "Products and Services".
And make the appropriate changes to the other fields if you would like.
Almost done!
Step 5: Add Form To Your Website
Now this is the final step to display the form to the users on the front-end.
There are multiple ways to do it, like using shortcodes, Gutenberg block or WordPress widget.
Here's how to do it on Gutenberg block editor:
Go to the page where you want to display the form and click on the "Add WPForms" option from the block.
Now select your form that you want to display here and hit the publish button to see it live.

Done and done!
By the way, you can also add the form in the widget area like any other WordPress widget.
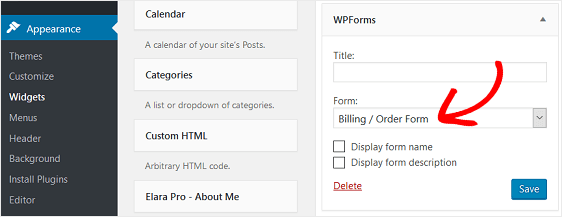
Just add the WPForms widget to your desired widget area and select the form and save it.
That's it.
Here's an example of a simple WordPress order form:
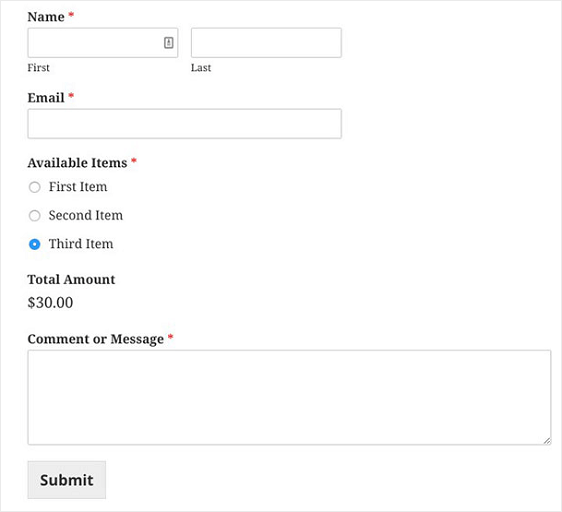
So how was it? Did you like it?
Let me know in the comments.
And if you don't have WPForms yet, go ahead and get one.
Try it for FREE
It's free to download. Go ahead and test it yourself.

