Disclosure: We use affiliate links for monetization. If you purchase anything, we may get a small commission at no extra cost to you. It helps a lot, so Thank You very much!
Want to enable recurring payments on your WordPress website? Or even one-time payment options.
It's super easy to do using WPForms that anyone can do.
Let me show you how it's done.
And start accepting recurring payments using WPForms.

Before we move on to the steps, let me introduce you to WPForms if you don't know anything about it.
WPForms is one of the most popular WordPress form builder available on the market. This is a drag and drop form builder which is easy to use and comes with a lots of features.
One of their amazing feature is that, you can accept payments from your visitors or clients using it's addons.
They provide some addons for payment solutions like PayPal & Stripe.
And you may already know that Stripe supports recurring payments. So we would be using that for this purpose.
Let's get going!
Install & Activate WPForms (Along With Stripe Addon)
Of course you need to install and activate WPFroms first. To make it work with the Stripe payment system, you must buy one of their premium license. The free version do not have this functionality.
So if you don't have it yet, go ahead and get a premium license.
Once you get it, download the plugin file from their website and install it on your WordPress website like you do with any other plugins. (no need to download the addon file.)
Now make sure to activate your plugin and verify your license so that we can move on.
Once you WPForms plugin is active, go to WPForms > addons.

Now find the Stripe option and click on "Install Addon" to download and activate the Stripe addon.

Once your Stripe Addon is downloaded and activated, go to WPForms > Settings from your WP Dashboard sidebar.

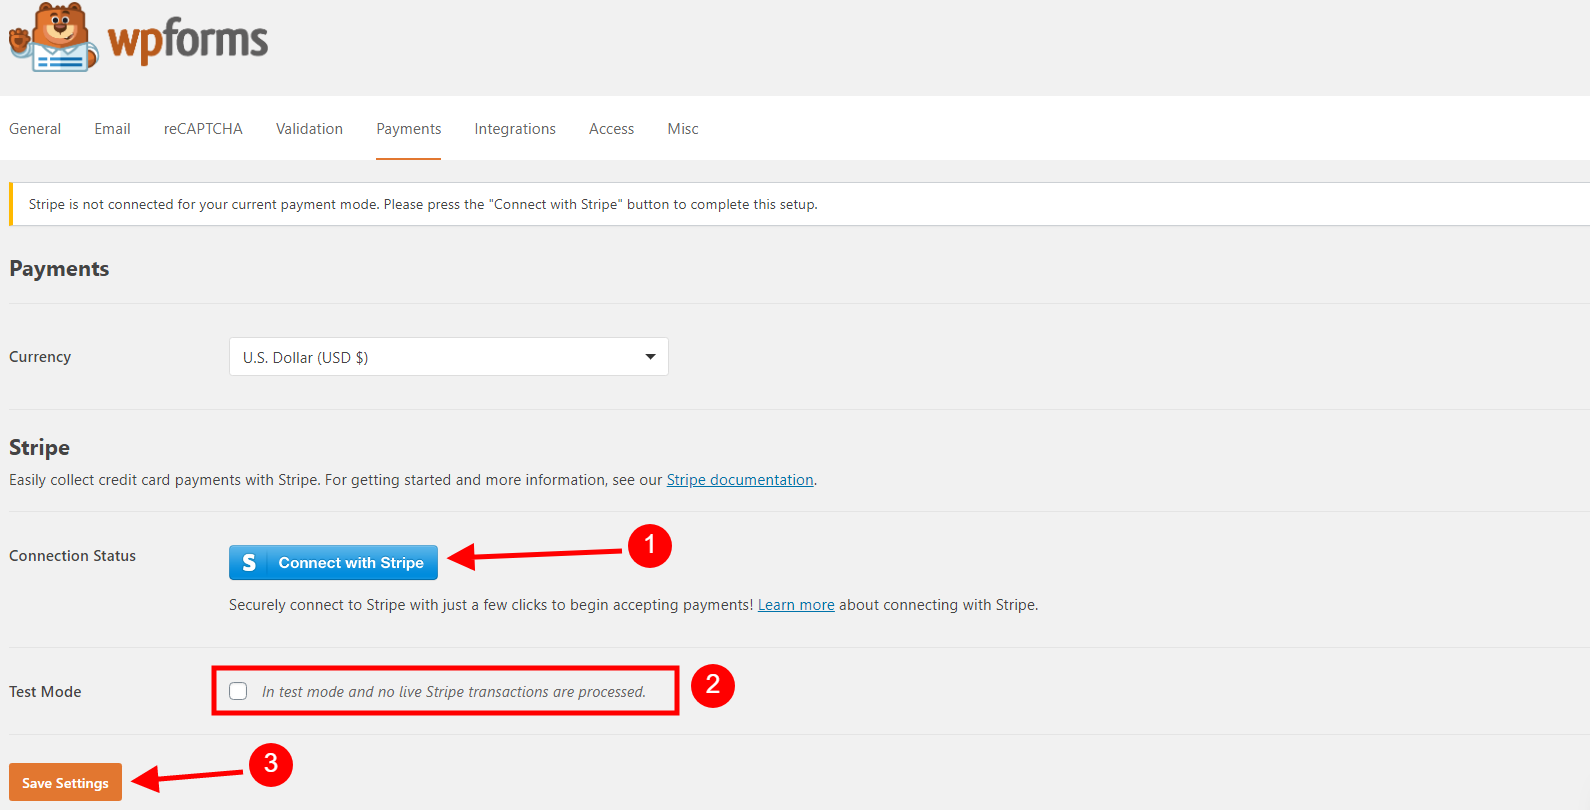
Now from your WPForms Settings dashboard, go to Payments tab.

You'll see a notice that stripe is not connected. Click on "Connect with Stripe" to proceed. I'll show you the process in a moment.
Once Stripe is connected, you can check the Test Mode if you want to or leave it and click on Save Settings.

Now here's the process of connecting Stripe.
When you click on the "Connect with Stripe" button, you'll be taken to the login page like the screenshot below.

Now Sign in to your Stripe account and you'll see the following page.

Fill all the required details on this page and make sure you have enabled two-step verification. If you haven't enabled it you can do it on the same page.
Once two-factor authentication is enabled, you'll be able to click on "Authorize access to this account" button.
Click on that.

It's done. You'll see the status on Stripe connection like the screenshot below on your WPForms settings page.

Click on Save Settings to save all the changes made and you are ready to go.
Add Stripe Payment Option In Your Form
To add the Stripe payment option in the front-end for your users, create any form and add Stripe Credit Card field to your form.

Once you add Stripe Credit Card field on your WPForms, go to Payments > Stripe and fill all the details.
As you can seen the screenshot below, there is a checkbox as well for recurring payments.
When you are done with all the details and settings, save your form and add it to your page to start accepting payments via Stripe.

Well, that was it.
Now you can start sending your visitors to the page to collect your payments.
Want to test it live? Here's my membership plan created using WPForms and Stripe. If you'd like to join, go ahead.
What do you think? Isn't it the easiest way to accept Stripe payments on your WordPress website.
Let me know in the comments below.
Don't Have WPForms Yet?


