Even before the pre-covid times, online learning or online courses were very popular, and now after this global pandemic, it has grown even more in popularity.
If you want to create a course of your own in 2021, that may or may not be difficult for you. It depends on your coding skills.
However, for people who don’t know how to code, there is a plugin called MemberPress that will allow you to do the same without any extra effort.
MemberPress is a learning management system that can help you build your first online course.
This is a simple drag-and-drop online course builder using which you can build your course without any knowledge on how to code.
MemberPress classroom mode makes your online courses look more professional.
Adding classroom mode to your website will be a great way to attract more customers and I will discuss about this further later in this article.
What Is MemberPress?
WordPress-based MemberPress is an LMS (learning management system) and online course builder that includes drag-and-drop functionality along with being an advanced WordPress Membership plugin.
Using MemberPress WordPress plugin, you can easily start your first subscription-based online course you want to sell.
You can create and manage your courses all by yourself. No need hire anyone.
This plugin works fine with any WordPress theme and it also works well with popular website builders like Divi and Elementor.
So that you can easily create an online course using your favorite website-building tools without any worry.
Introducing Classroom Mode In MemberPress Courses
Classroom mode is a feature in MemberPress that makes your website look more appealing and professional.
Using this option, you can select a logo for your course and you can even select the color.
It is possible to add custom CSS to completely personalize the look and feel of the page for your course.
You can also incorporate CSS to customize the buttons/links on your website.
This Classroom mode feature is really useful for your course page.
Now we will look at the steps to make your first online course.
Create Your First Online Course Using MemberPress Plugin
Before jumping on to our next step, you need to ensure that you have successfully installed MemberPress and you have successfully activated it.
Then you need to go to your dashboard and then MemberPress → Courses and then you need to click on activate course add on.
After enabling the Classroom Mode on you can move ahead to create your first online course using MemberPress.
Step 1 - Create A Course Page
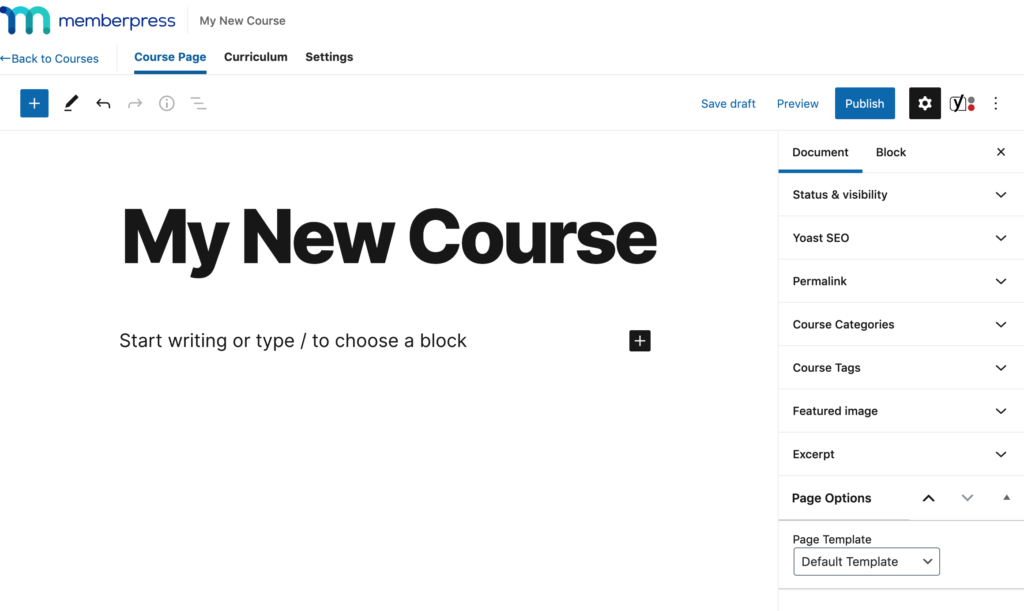
First, go to the course section and select the option called “Add New”.

After doing this, you will be taken to the MemberPress course editor where you can add titles and descriptions to your course.
On your right, you will see a tab where you can fill in additional details related to your courses such as tags and categories.

I would recommend you to take your time to carefully fill up this section because in the future it can help you to organize your course content or classes.
Once you are done with this section, you need to click on the publish button and move on to the next step.
Step 2 - Add Your Course Curriculum Using The MemberPress Courses
Next, you need to go into the column tab of the course editor where you can add the contents of your course.
To create your first module, you need to click on the option called “Add Section”.

Next, you need to add lessons by just expanding each section with the arrow button.
To start adding content to each module, you need to click on the pencil icon on the toolbar.
This will take you to the lesson editor where you can add content for your course.
You will also have the option to preview or delete a course from this same toolbar.
After adding your content to the course you need to click on the save option to move to the next step.
Step 3 - Manage The Access Rules For Your Courses
After setting all these up, you need to enable the option called “Include In Course Listing” under the settings tab.
After this, MemberPress will automatically create a URL for your content.

You can also place restrictions on your content.
You can also set rules for outside customers so whenever they click on a course they don’t have access to they will be redirected to the page where they can sign up for your page.
Step 4 - Enable Classroom Mode
Classroom mode is a very useful and unique feature provided by MemberPress.
To enable this setting, you need to go into MemberPress and then into the settings menu.
Then you need to click on the course tab.
Here you can enable the classroom mode feature which will give your website a more professional and minimal look.

The Classroom Mode feature will also set the colors for your website and it also lets you add a featured image for a course and you can also customize the buttons on your website by integrating custom CSS.
Change The Featured Image Of Your Course
To do so, you need to go into the dashboard, then click on the MemberPress option, and then the course.
Edit the course for which you want to change the image.
There, you will see an option called “Set featured image”.

You can use a new image or an existing one.
Conclusion
Offering online courses used to be a very tough job but thanks to MemberPress it has become so easy even for a non-technical person who knows nothing about coding.
And features like classroom mode make this MemberPress plugin more attractive and popular.
Try using MemberPress today to create your first online course website on WordPress. It will decrease your workload and headache significantly.
And if you have any questions, feel free to drop them in the comments section.
related resources


