Need forms that allows visitors to upload files?
Here in this post, I'm going to show you how to add file upload form in your WordPress website.
It's so easy that anyone can do it. And of course, no coding required.
Before we move on to the tutorial, let's see some use cases of the file upload field or form.
What Are The Use Cases Of File Upload Forms?
The file upload form is useful in many situations and very important for most of the situations.
Here are a few examples for you:
- Customer Support Forms (To Include Screenshots Or Videos Explaining The Issue.)
- Registration Forms (Where You Need Documents To Verify.)
- Job Applications (To Upload CV, Resume, And Stuff Like That.)
- Image, Video, Or Any Type Of File For Online Contests. Such As Photography Contest.
- Freelancing Website, Or Websites Of That Nature.
- Podcast Clips For QnA Or Collaboration Episodes.
- Any Many More Other Instances...
Now let's have a look at the solution for you.
How To Create File Upload Forms On Your Website?
The easiest way to create WordPress File Upload Forms is to use WPForms. WPForms let's you use file upload fields in their drag-and-drop WordPress Form Builder easily without any trouble and coding.
The WPForms file upload feature supports the following file formats:
- Documents (.pdf, .xls, .ppt, .doc, etc.)
- Images (.jpg, .png, .gif, etc.)
- Video (.mpg, .mov, .mp4, .wmv, etc.)
- Audio (.wav, .mp3, .m4a, etc.)
For WordPress security reasons, by default you cannot upload all the file types that WPForms supports.
The default file types that can be uploaded are limited but you can allow other file types as well. You can learn to do it here.
Now let's have a look at the steps to create WordPress file upload forms.
If for some reason you don't want to watch the video then here's text and image based instructions:
Create File Upload Form
First of all you need to install and activate WPForms on your website if you haven't done it already.
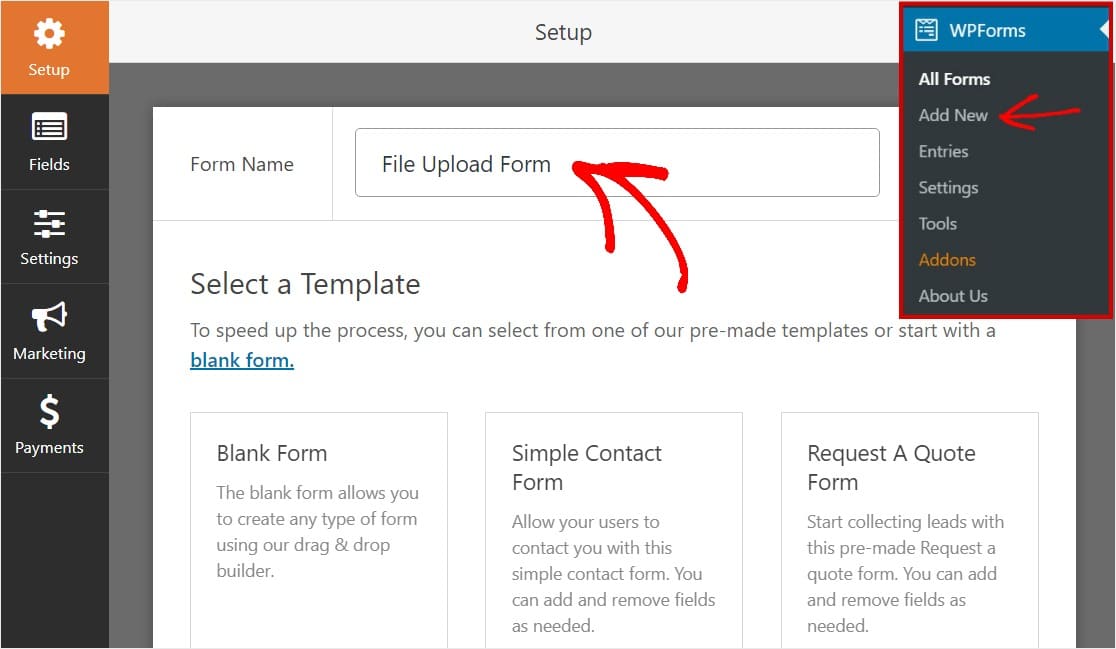
Once done, go to your WordPress dashboard and go to WPForms » Add New to create a new form and name it whatever you wish.
Then if you have any specific requirements for your form then choose your form accordingly or you can even start from a blank template.
It's easy to add file upload field to any of your forms using it's drag and drop form builder so there's nothing to worry about.
And if you are only trying to make a file upload form then there's a ready made template is available for that.
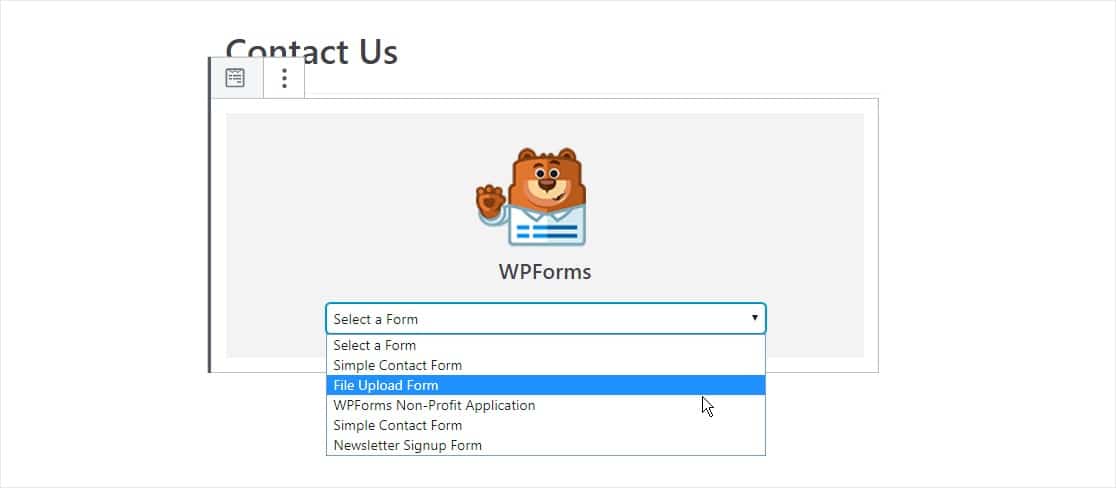
To use that, scroll down to the additional templates section and type or search "File Upload Form".
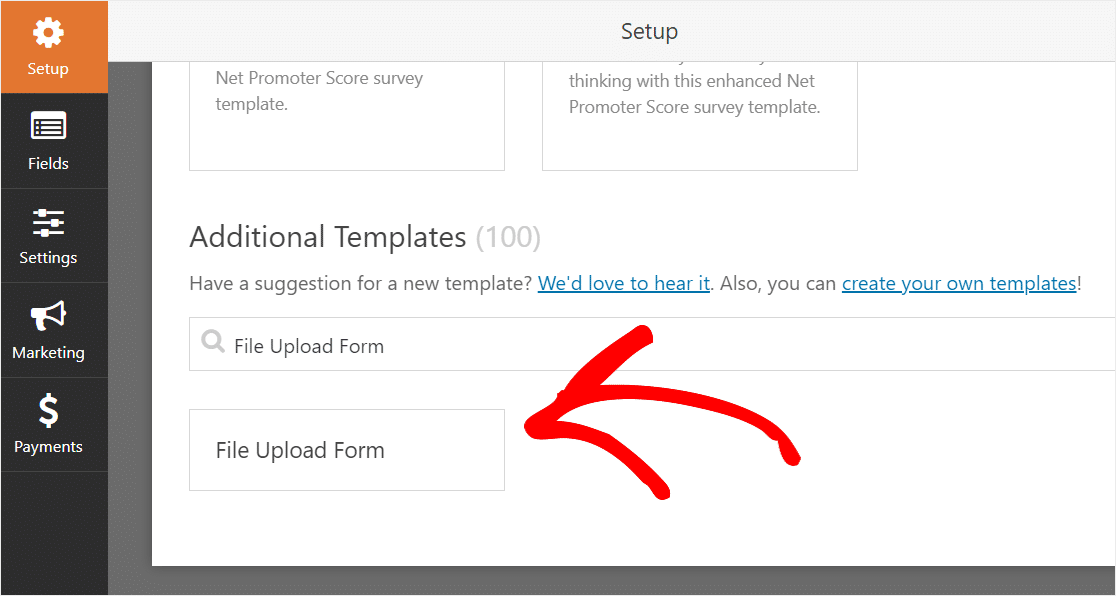
You must have enabled the "Additional Form Templates Pack" addon to access these pre-built form templates.
Now select the File Upload Form template as shown on the screenshot above.
It should open up the drag and drop form builder along with the file upload field.
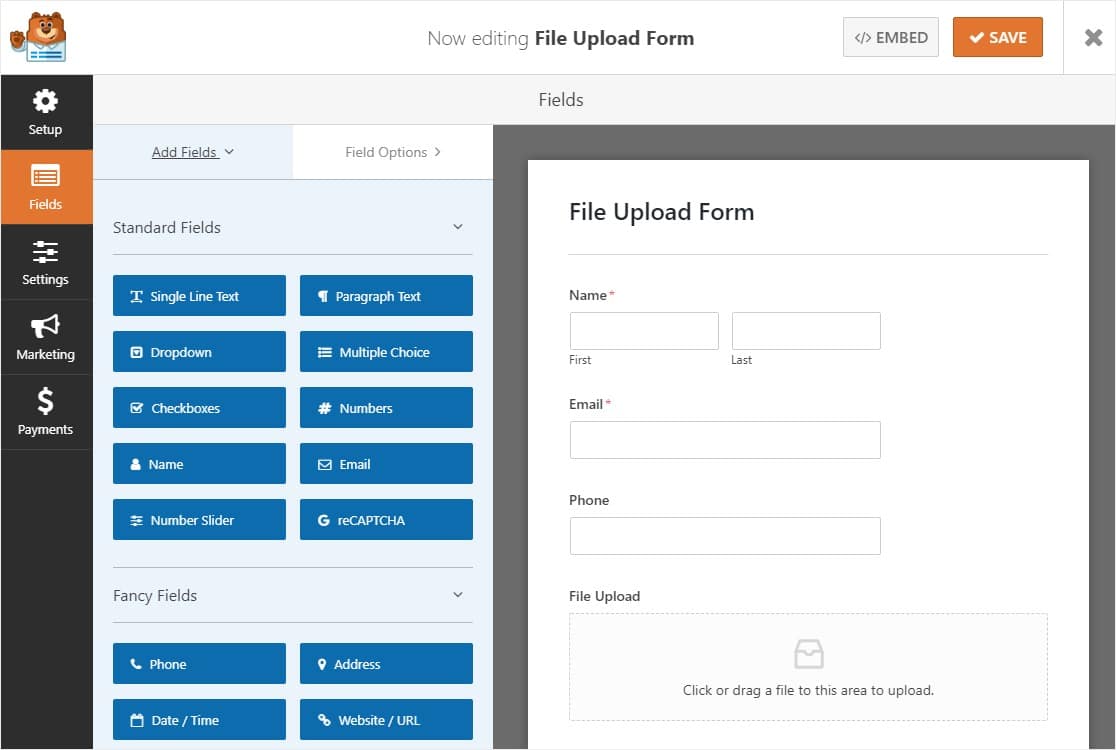
With the File Upload Template, you'll have the following fields already added to your drag and drop form builder:
- Name
- Phone
- File Upload
- Additional Comments Field
If you want, you can click on any of the form fields to make changes or customizing the form.
To re-arrange the form fields, just drag and drop the form fields and it will be done. Cool right?
By the way, like I said earlier; you can also include the file upload field to any of your form or even a blank form.
Again, just drag and drop to do that.

By clicking on the file upload field on the right panel of the form builder, you can change the following settings (settings will appear on the left panel):
- Label - Display/Name the file upload field, so that the user know why the field is for.
- Max File Size - Specify the max file size in MB that is allowed for the upload. By default, it will be 128MB.
- Description - Add a small description for the field to explain why and how the field should be used. For example, if you have a 5MB max file size limit then you may disclose it in the field description for the convenience of your visitors.
- Allowed File Extensions - As the name suggests, using this field setting you can allow specific file types and discard or disable other file types.
- Required - This will make the field required and the form won't submit until the user uploads the file.
- Style - You can choose from the available styles for your file upload form field.
Where The Files Will Be Saved On Your Website?
If you don't make any change in the settings of the file upload form field then it will save all the files in a folder named WPForms inside your uploads directory.
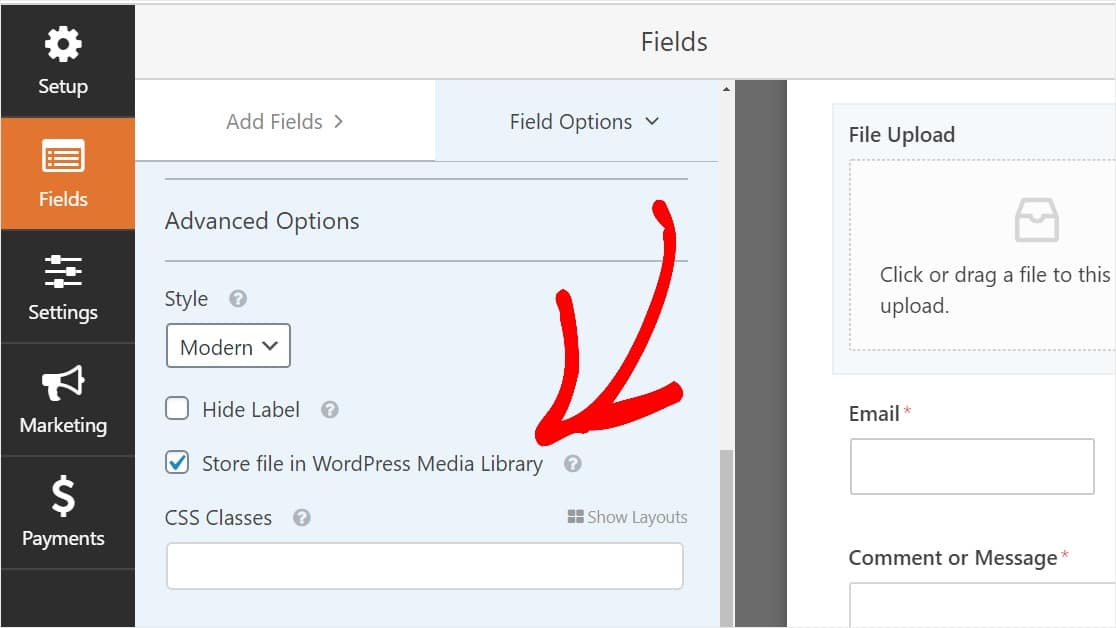
However, you also have a choice of uploading or saving the files inside your media library.
To do that, click on the file upload form field on the right panel and then just check the "Store files in WordPress Media Library" in the left panel.
Customizing File Upload Form Settings
When your form builder is open, go to Settings » General

Here you can customize the following things:
- Form Name
- Form Description
- Submit Button Text
- Spam Prevention Options
- GDPR Settings
When you're done, just click on save to save all the settings.
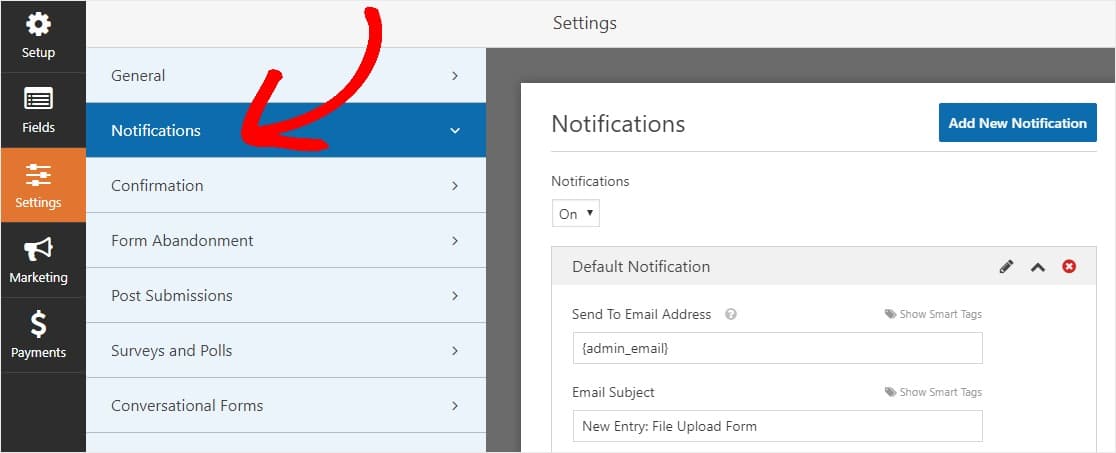
Configure Form Submit Notifications
In the same settings panel, there's an option to customize notification for the form submissions. Click on that to customize it.
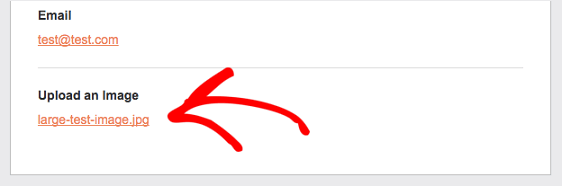
The form submission notifications looks like this:
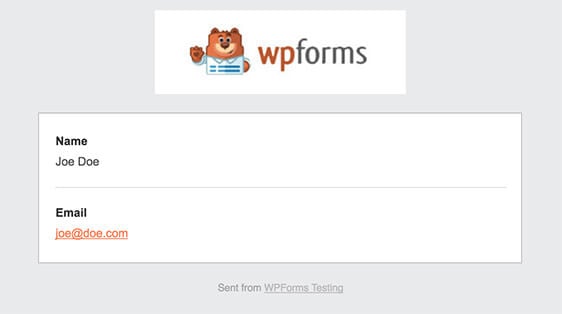
For some security reasons, WPForms notification does not contain the file upload but a link to the file.
It should look like this:
What Would The Visitors See On A Successful File Upload?
Well, there are a couple of options to choose from for what happens after a successful upload by the user.
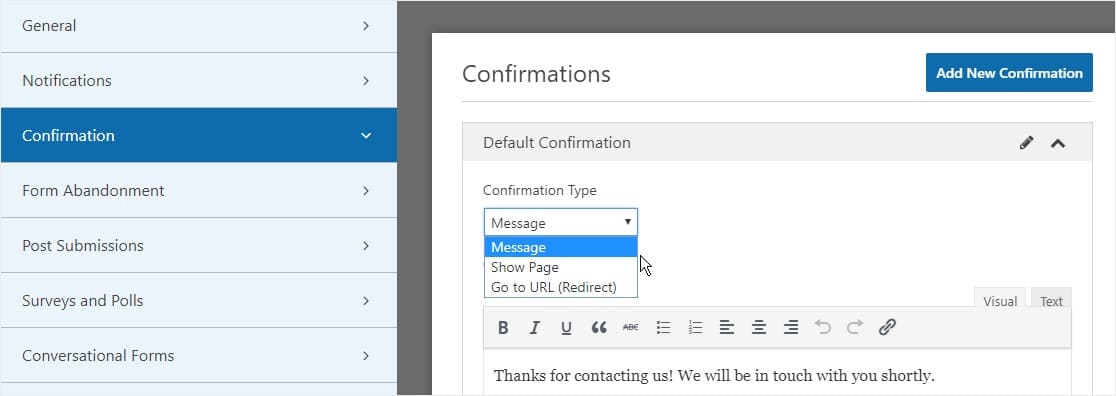
You can customize these settings under "Confirmation" settings.
There are 3 options available for successful form submissions:
- Message - Display a success message on the same page. You can customize the message as per your requirements if you want.
- Display Page - You can also choose to display a page upon a successful form submission. This is one of the most profitable method if you are into sales and marketing.
- Redirect - You can use this method for advanced redirect, instead of display a static page you can send some values to the URL for a dynamic content display. Or you can even redirect the user to external websites.
Adding The Form To Your Website
There are multiple ways to insert the form to your website. You can use the block editor, classic editor, shortcode, or even widgets to display your form to the users.
If you want you can also create permalink for your forms to use it like Google Forms.
Viewing The Files And Entries
To view the entries and files, go to WPForms » Entries.
If you have multiple forms, then you can select the form that has the file upload field.
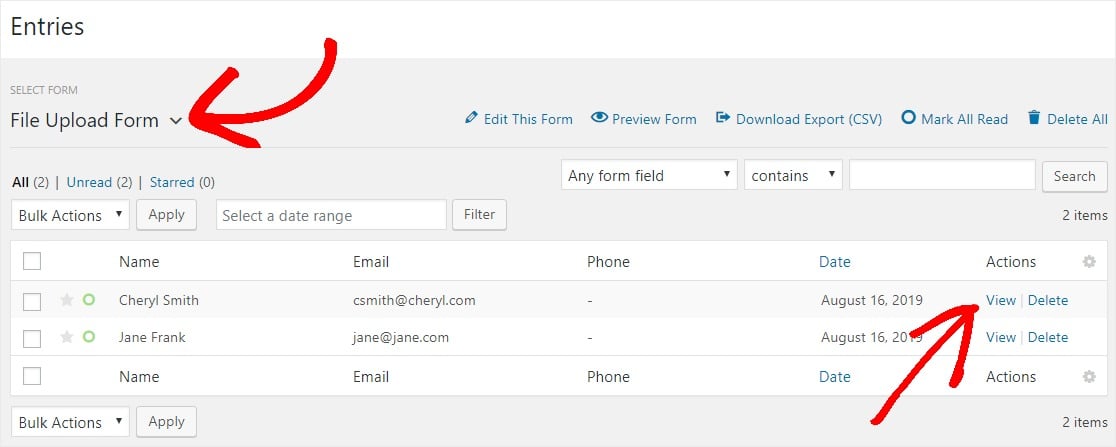
To download the files, you can right click and save the file on your device.
If you don't want to download each files manually then you can also use the Zapier addon to automatically upload the files to your Google Drive, Dropbox or any other actions.
Wrapping Up
Well that was it. Your WordPress file upload form is up and running without any coding or a complex process. You can do much more than this using WPForms if you want.
Now let me know how you'd be using this feature of WPForms or if you need any help in the comments below.
Try it for FREE
It's free to download. Go ahead and test it yourself.