Are you familiar with MemberPress? MemberPress is the most popular WordPress membership plugin.
If you want to sell your course or build a website where you can sell your knowledge as courses, then MemberPress can help you do that.
It is possible to restrict access to certain parts of your site using MemberPress.
Since you are already familiar with MemberPress, I will illustrate how to use the Content protection rule in MemberPress to protect content from certain users.
Would you like to know how? You will find your answers in this article.
Stay tuned with me because I'll be discussing how you can apply MemberPress content protection rules and what are the benefits of doing it.
You can also watch the video below if you don't like reading.
Why Use Content Protection Rules On Their Membership Site?
Regularly posting content to attract a large number of customers to your website is the key to building a loyal customer base that will come back again and again.
If you want to reward your premium customers with free eBooks, webinars, or courses, then MemberPress content protection rules can help you do this very easily.
Users can choose to access free and premium content on your website or you can give them limited access to premium content.
It is a trick to attract more customers to your website and convince them to buy the premium membership.
By taking advantage of both content marketing and lead generation, you can control who has access to your content and who does not.
3 Ways Of Using MemberPress Content Protection Rules
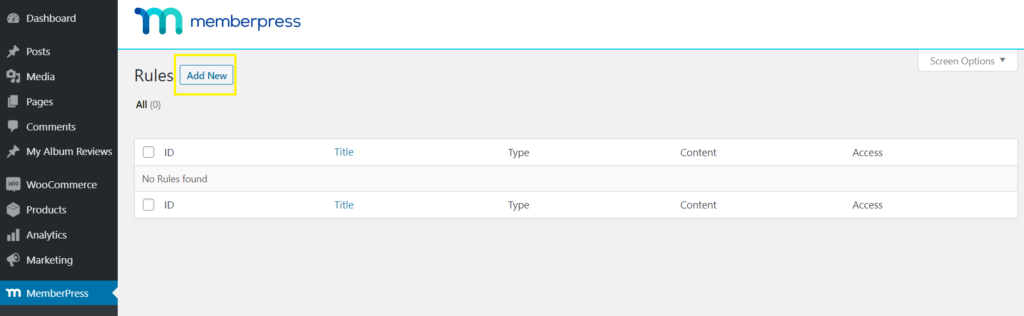
You can access the member protection rules by going to the MemberPress dashboard and then clicking the "Rules" link.
You need to scroll down and look for an option called "Content And Access" that allows you to restrict the contents of your choice.
In total, you can restrict content based on 6 different methods. So now let’s discuss all of them
All Content
This option can put a restriction on every content of your website. You can also add an exception to this restriction by entering that particular page id.
Post Categorized And Post Tagged
Using this technique, you can put restrictions on content that belongs to a specific category or tag.
Single Post
Using this rule, you can put restrictions on individual posts by entering their name in the related field.
All Posts
With this rule, you can put restrictions on every post on your site and only mention posts id's that should be excluded from the rule.
Custom URL
If you want to protect a specific URL, then this rule will help you achieve that.
Custom Post Type
If you have ever created a custom post and want to protect it, then this rule will help you do that.
Now we will look at some ways where you can implement this rule on your website:
Set Member Specific Rules
MemberPress lets you have full control over your content. It also lets you decide whether specific content is accessible by a premium member, a normal member, or both.
By upselling membership, you can also maximize revenue for your business.
It would be beneficial for your users to purchase a premium membership so that they could access more content while you'll be growing your business.
Create Drips And Expirations
The drip method means you offer a reward to your audience but the reward doesn't unlock until they perform a certain action.
You can also drip partial content, such as showing your views on the first few lines of an article, but they will need to subscribe to your site to see the rest.
You can also fix the duration of these restrictions.
For example, you may want to give your users free access to all the premium content on your website for 15 days.
Experiment With Advanced Rules
There are also a few advanced features you can play with which will allow you to restrict content on a more advanced basis.
With partial content codes, you can protect each paragraph, image, or widget separately. Hide the selected portions with a PHP snippet or a shortcode.
If you know regex, you can also create protections for things that match your expressions. Depending on the content, you can also protect specific directories.
How To Implement MemberPress Content Protection Rules?
Go to MemberPress and then rules and then click on the option called “Add New”.
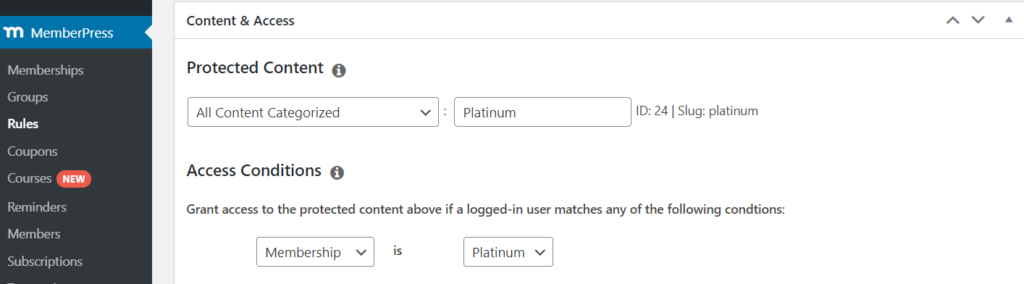
Next, you need to go to the protected content, select all the content, and select platinum in the next field.
Now, under the access conditions, you need to select the specific membership that can access your content, in this case, it is platinum.
You can also configure drips from here. You need to scroll down and you will get the option to enable the Drip function.
Conclusion
Using the MemberPress content protection rule, it is much easier to attract premium customers.
It is also possible to protect premium pages and sites so that other websites can't access them.
I have mentioned all the important things about MemberPress Content Protection Rules. If you're not using it yet, now is the time.
However, If you have any further questions you can ask them directly.